Walkthrough: a certificate on IIS with the agent
From an issued certificate to a working HTTPS site on a Windows IIS server, in about ten minutes. The server needs no open inbound ports and NeverLapse stores no password for it: a small agent on the server collects the certificate, installs it and binds it in IIS, and does it again after every renewal.
Before you start
- NeverLapse Cert 1.3.5 or later on your NeverLapse server. Version 1.3.6 or later keeps a binding that NeverLapse created ticked on the host's page (see step 8). Older versions could not bind IIS at all.
- An issued certificate for the website's name. If you don't have one yet, see Certificates, or follow the GoDaddy walkthrough.
- A Windows server running IIS (Windows Server 2016 or later) with the website already set up for plain HTTP. A brand-new IIS server's Default Web Site is enough.
- A DNS record for the website's name that points at that server, so browsers end up there.
- The IIS server can reach your NeverLapse server's address on TCP 443, the same address you use to open NeverLapse in a browser. Only this outbound connection is needed. NeverLapse never connects to the IIS server.
- An administrator sign-in on the IIS server, to install the agent once.
1. Check the certificate
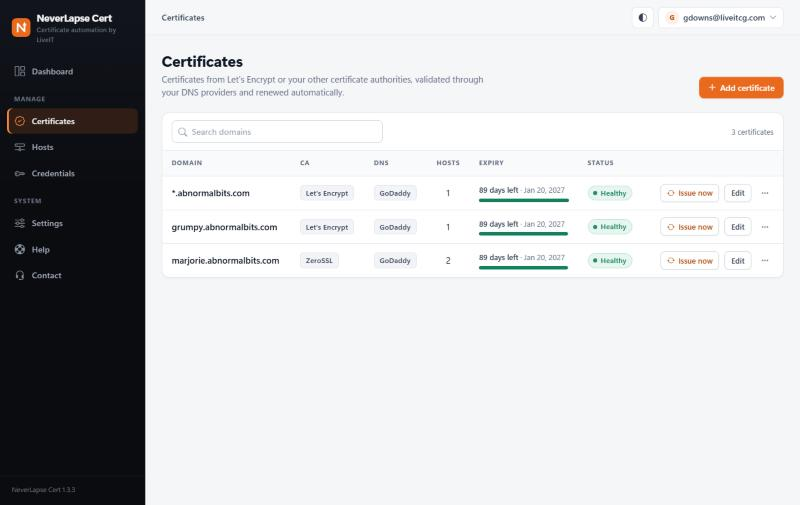
Open Certificates. The certificate you want to use should show as issued, with an expiry date. The agent can only collect a certificate that NeverLapse has already issued.
2. Add the server as a host
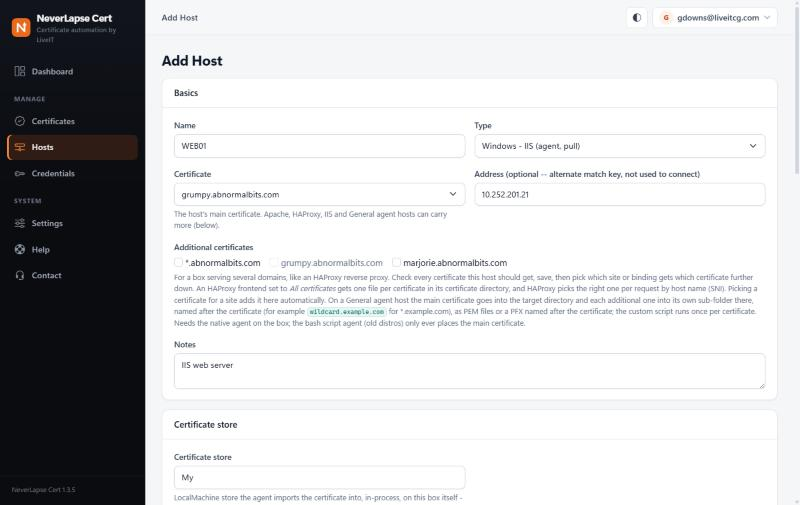
Open Hosts and click Add host. Fill in:
- Name: a name you'll recognise, for example the server's computer name. The agent uses it to find its own settings, so keep it short and don't change it after the agent is installed.
- Type: Windows - IIS (agent, pull).
- Certificate: the certificate from step 1.
- Address (optional): the server's IP address. It's only a note and a second way to match the server. NeverLapse never connects to it.
- Notes (optional): anything that helps your team, for example what the site is.
3. Leave the certificate store as it is
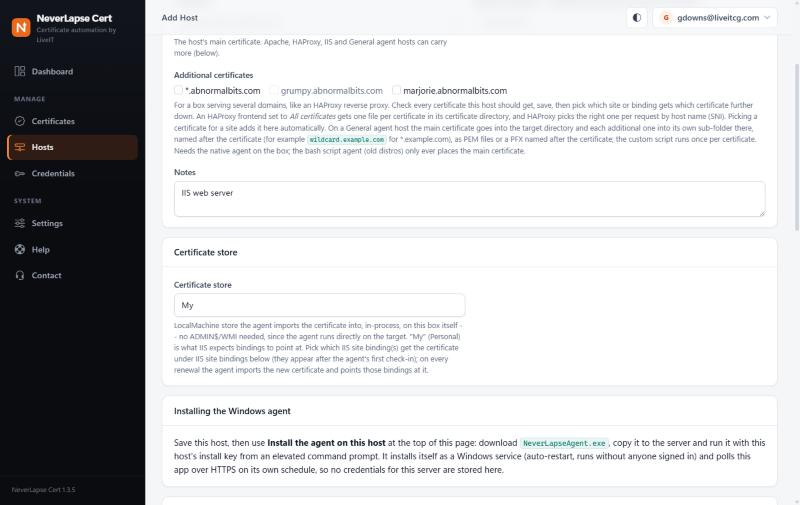
Further down, Certificate store is already set to Personal (My), which is what IIS uses. Leave it unless you know your site needs another store (for example Web Hosting).
4. Save the host
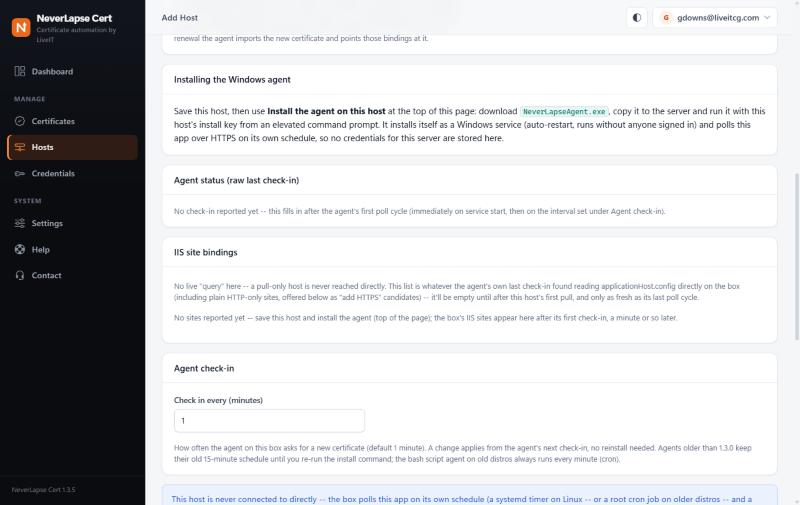
The IIS site bindings and Agent check-in sections are still empty: there's nothing to pick until the agent has looked at the server. Click Save.
5. Install the agent on the IIS server
Open the host again (Hosts > Edit). The box at the top, Install the agent on this host, gives you two commands with your server's address and this host's install key already filled in. Use the Copy buttons.
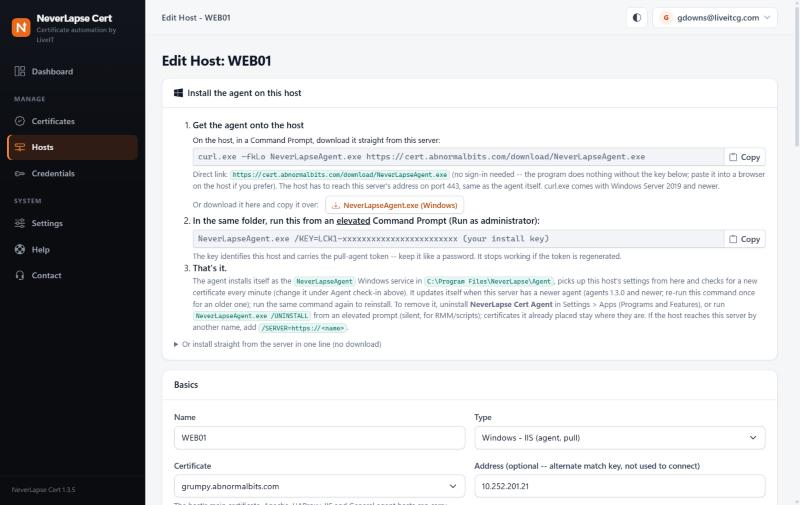
On the IIS server, open a Command Prompt as administrator (right-click, Run as administrator) and run the two commands in the same folder.
a. Download the agent from your NeverLapse server:
curl.exe -fkLo NeverLapseAgent.exe https://cert.example.com/download/NeverLapseAgent.exeb. Install it with the host's install key:
NeverLapseAgent.exe /KEY=LCK1-...your install key...You should see something like:
NeverLapse Agent 1.3.5 -- installing for host "WEB01"
  Server: https://cert.example.com
  Type:   IIS (certificate store My)
  Installed to C:\Program Files\NeverLapse\Agent
Done. The NeverLapseAgent service is running and checks for a new certificate every minute (change it on the host's page); it can update itself from the server (Hosts page > Update selected agents, or automatic updates in Settings > Pull Agents).
Its first check runs now; the result shows on this host's page in NeverLapse within a minute.If you can't run commands, the NeverLapseAgent.exe (Windows) button downloads the same file. Copy it to the server, then run step b in an elevated Command Prompt in that folder. You can also deploy it from your RMM tool with the same command line; it installs silently.
6. Check that the agent checked in
Back in NeverLapse, open Hosts. Within a minute the new host shows Agent pulls, the agent's version and checked in just now.
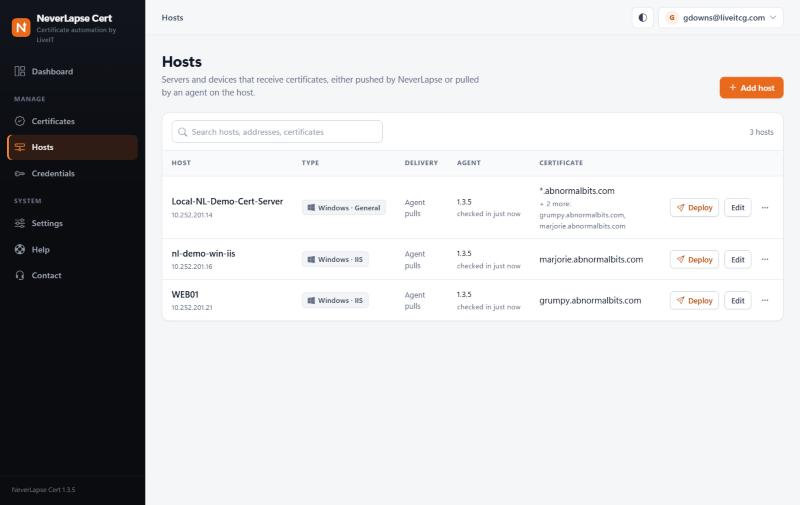
At this point the certificate is already in the server's Personal store, but IIS isn't using it yet. That's the next step.
7. Pick the IIS binding
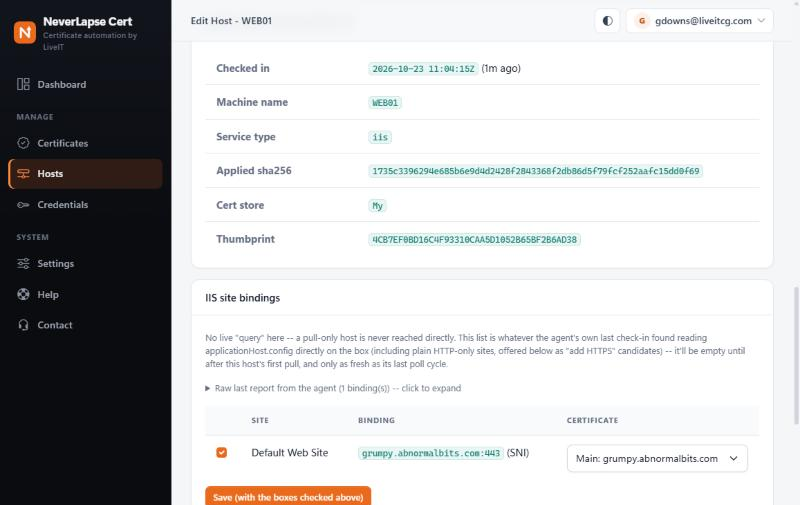
Open the host again. The Agent section shows what the server reported: when it checked in, the machine name, the certificate store and the thumbprint of the certificate it installed. Below it, IIS site bindings lists the sites the agent found on the server.
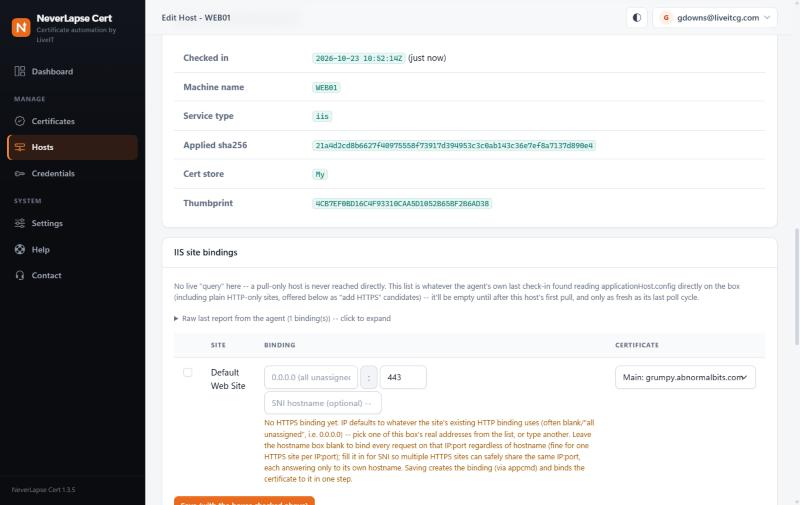
A site that only has HTTP so far is offered as a new HTTPS binding. Tick it and set:
- IP address: leave it blank for all unassigned addresses (the usual choice), or pick one of the server's addresses.
- Port: 443.
- SNI hostname: the website's name, here
grumpy.abnormalbits.com. Fill this in whenever the server has, or may later have, more than one HTTPS site on the same IP and port. Each site then answers only for its own name. - Certificate: the host's certificate (Main). A host with several certificates can use a different one per binding.
A site that already has an HTTPS binding is listed as it is. Tick it and NeverLapse moves it to this certificate.
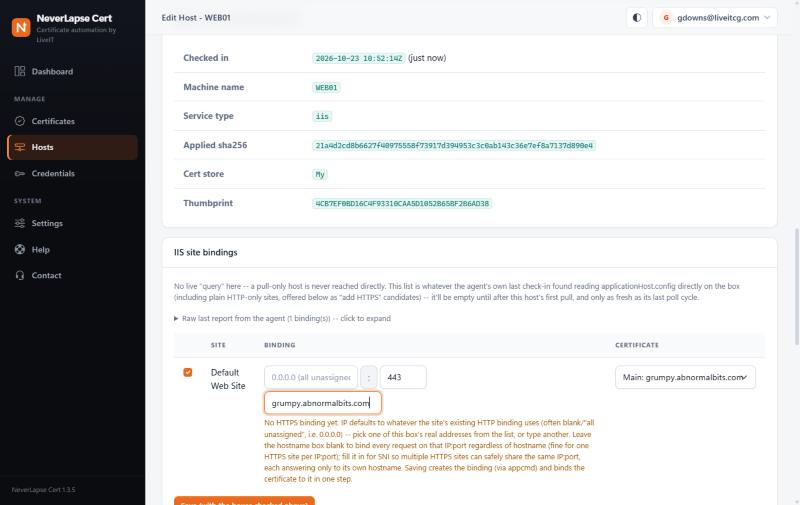
Click Save (with the boxes checked above).
8. Wait for the next check-in
On its next check-in (within a minute), the agent creates the HTTPS binding in IIS and attaches the certificate to it. Open the host again: the binding is now listed as a real HTTPS binding, ticked, with its certificate.
If something went wrong, the reason shows as Last error in the Agent section, and the agent tries again on every check-in.
9. Check the website
Open the site in a browser: https://grumpy.abnormalbits.com in this example. It loads with no certificate warning. To check on the server itself, run this in PowerShell as administrator:
Import-Module WebAdministration
Get-WebBinding -Protocol https
netsh http show sslcert hostnameport=grumpy.abnormalbits.com:443
You should see the HTTPS binding (*:443:grumpy.abnormalbits.com, sslFlags 1 = SNI) and a Certificate Hash that matches the thumbprint on the host's page. From any other machine you can also check which certificate the site sends:
PS> $r = [Net.HttpWebRequest]::Create('https://grumpy.abnormalbits.com/'); $r.GetResponse().Close(); $r.ServicePoint.Certificate | Format-List Subject, Issuer
Subject : CN=grumpy.abnormalbits.com
Issuer  : CN=YR2, O=Let's Encrypt, C=US
What happens from now on
- Renewals are automatic. When NeverLapse renews the certificate, the agent picks it up on its next check-in, installs it and moves the binding to it. You don't need to do anything.
- Check-in interval: every minute by default. Change it under Agent check-in on the host's page (1 to 1440 minutes). Checking in costs almost nothing: the agent downloads a certificate only when it has changed.
- Agent updates: after you upgrade NeverLapse Cert, update the agent from the Hosts page (select it, then Update selected agents), or turn on automatic agent updates under Settings > Pull Agents. It re-applies the certificate and bindings once after updating.
- More sites on the same server: tick more bindings in step 7. Each can use a different certificate; see several certificates on IIS.
- Removing the agent: on the server, Settings > Apps > NeverLapse Cert Agent > Uninstall, or
NeverLapseAgent.exe /UNINSTALLfrom an elevated prompt. Certificates and bindings it set up stay in place.
If it doesn't work
- The host never checks in. On the IIS server, check that the NeverLapse Cert Agent service is running (
Get-Service NeverLapseAgent), and that the server can reach your NeverLapse address: in PowerShell,Test-NetConnection cert.example.com -Port 443should sayTcpTestSucceeded : True. A proxy or firewall blocking outbound 443 is the usual cause. - "Unauthorized" or the host stopped checking in after a change: the pull token was regenerated (Settings > Pull Agents) or the host was renamed. Copy the install command from the host's page again and rerun step 5b.
- No sites listed under IIS site bindings: IIS isn't installed on that server, or the agent hasn't checked in yet. Click the host again after a minute.
- Browser shows a certificate for another name, or a TLS error: another HTTPS binding on the same IP and port is answering. Give each HTTPS site its own SNI hostname (step 7). On NeverLapse Cert older than 1.3.5, upgrade first: IIS binding didn't work before that.
- Last error on the host's page: it includes the IIS or netsh message. Fix the cause; the agent retries on every check-in. The agent also writes to the Windows Application event log, and its self-update log is
C:\ProgramData\NeverLapse\Agent\update.log.
More on the agent: the Windows agent. More on IIS: IIS bindings.